

The Water Discovery At-Home Activity Guide incorporates hands-on educational activities from our Water Discovery Field Trip Program for grades K-12th. The activities will teach students about water resources, water use efficiency methods and the environment. The activities align with California State Curriculum Standards; Science, Technology, Engineering, Arts and Mathematics (STEAM); and Next Generation Science Standards (NGSS).
Objective: To educate students on the parts and functions of plants.
Curriculum grade: K-3rd
Directions
Materials:
- Activity Sheet (click to download & print)
- Plant Factory Worksheet, Pencil, Coloring Pencils, Crayons, Markers, or Highlighters
Duration: The duration of this activity will be ~30 minutes.
Discussion (before activity):
Can you describe a plant for me?
- Student may guess a seed, green leaves, flowers…
What does a plant need to live?
- Sun, water, soil, food (carbon dioxide, water and sunlight)
Did you know that plants are made up of many parts?
- Plants usually have five major structural parts: roots, stem, leaves, flowers, and fruits. Each part is very important to a plant because each part has an important job to do.
Let’s discuss each part of the plant and see what its functions are!
Activity
As you discuss each part of the plant have student identify and label it on page 1 of the worksheet and then fill out its importance on page 2 of the worksheet. They may color the flower in before or after the activity!
ROOTS:
Why roots are important? What do roots do?
They drink/absorb water from the soil.
STEM:
What about the stem? Why is the stem important?
It gives support to the plant and delivers food and water.
LEAVES:
Now, what about leaves? What do leaves do?
Leaves are very important because they make food. When a leaf starts to make food it is called photosynthesis. When photosynthesis happens, leaves use sunlight, carbon dioxide, and water to make sugar (glucose) and those are the ingredients plants use to make their food. Photosynthesis is important because it provides two main things: food and oxygen. When plants make food, they absorb the carbon dioxide from the air and release oxygen during the photosynthesis process.
FLOWERS:
Okay, now let’s talk about flowers. What is the job of flowers?
Flowering plants have a specific type of system that allows it to produce flowers to reproduce. Flowering plants produce seeds within a fruit. Flowers are the reproductive organs of the flowering plant. To reproduce a plant, insects and birds must pollinate the plants. As the insects and birds move from plant to plant, they move the pollen from one plant to another. This allows for the plants to reproduce by creating new seeds. Not all plants produce flowers. Plants such as ferns and moss use spores to reproduce instead of seeds.
SEEDS:
Last part, why do some plants make fruit?
Fruits are a way many plants spread their seeds. Fruits are formed after the flower is fertilized with pollen. Fruit gives humans and animals food and they are also important in spreading seeds.
Now that we have seen what each part of the plant is and why it’s important, let’s get moving!
Have student come up with a movement/dance for each part of the plant.
For example: The stem of the plant provides support to keep it standing, therefore it must be very strong. The student can pick their arms up and flex their muscles nice and strong!
Once the student has come up with movements for each part call them out as quickly or as slowly as you would like and have fun!
Discussion
Just like our own bodies, plants have many different parts that keep them healthy and strong! Now that you know each one be sure to give your plants enough water, soil, and sunlight to keep them growing!
Next Generation Science Standards* Connections
Kindergarten
- K-PS3 Energy
- K-ESS3 Earth and Human Activity
1st Grade
- 1-LS1 From Molecules to Organisms: Structures and Processes
- 1-LS3 Heredity: Inheritance and Variation of Traits
2nd Grade
- 2-LS2 Ecosystems: Interactions, Energy, and Dynamics
- 2-LS4 Biological Evolution: Unity and Diversity
3rd Grade
- 3-LS1 From Molecules to Organisms: Structures and Processes
- 3-LS3 Heredity: Inheritance and Variation of Traits
Common Core State Standards Connections
Kindergarten
ELA/Literacy RI.K.1, W.K.2, SL.K.3, SL.K.5, W.K.7
Mathematics MP.2, MP.4, K.CC, K.MD.A.2
1st Grade
ELA/Literacy RI.1.1, RI.1.2, RI.1.10, W.1.7, W.1.8
Mathematics MP.2, MP.5, 1.MD.A.1, 1.NBT.B.3, 1.NBT.C.4, 1.NBT.C.5, 1.NBT.C.6
2nd Grade
ELA/Literacy W.2.7, W.2.8, SL.2.5
Mathematics MP.2, MP.4, MP.5, 2.MD.D.10
3rd Grade
ELA/Literacy RI.3.7, SL.3.5, RI.3.1, RI.3.3, RI.3.2, W.3.2, SL.3.4
Mathematics MP.4, 3.NBT, 3.NF, MP.2, MP.4, 3.MD.B.4
Objective: To demonstrate how water pollution can result from a variety of activities and sources in our own backyards and neighborhoods, and how the pollution can impact our water resources.
Curriculum grade: 3rd – 8th
Directions
Materials:
- Activity Sheet (click to download & print)
- Activity Sheet Answer Key (click to download & print)
- Colored markers, pens, crayons, or pencils
- Aluminum Foil
- Plastic Bin
- 2 Kool-Aid mix (one blue, one red)
- Chocolate Sprinkles
- Spray bottle
- Cups of various sizes from kitchen
- Water
- Towels or paper towels
Program Outline: Explain the model and go over the various land uses on the watershed. Then, provide an interactive lesson on water pollution by explaining watersheds, local pollution sources, how rain can impact water quality, and discuss how to keep water clean.
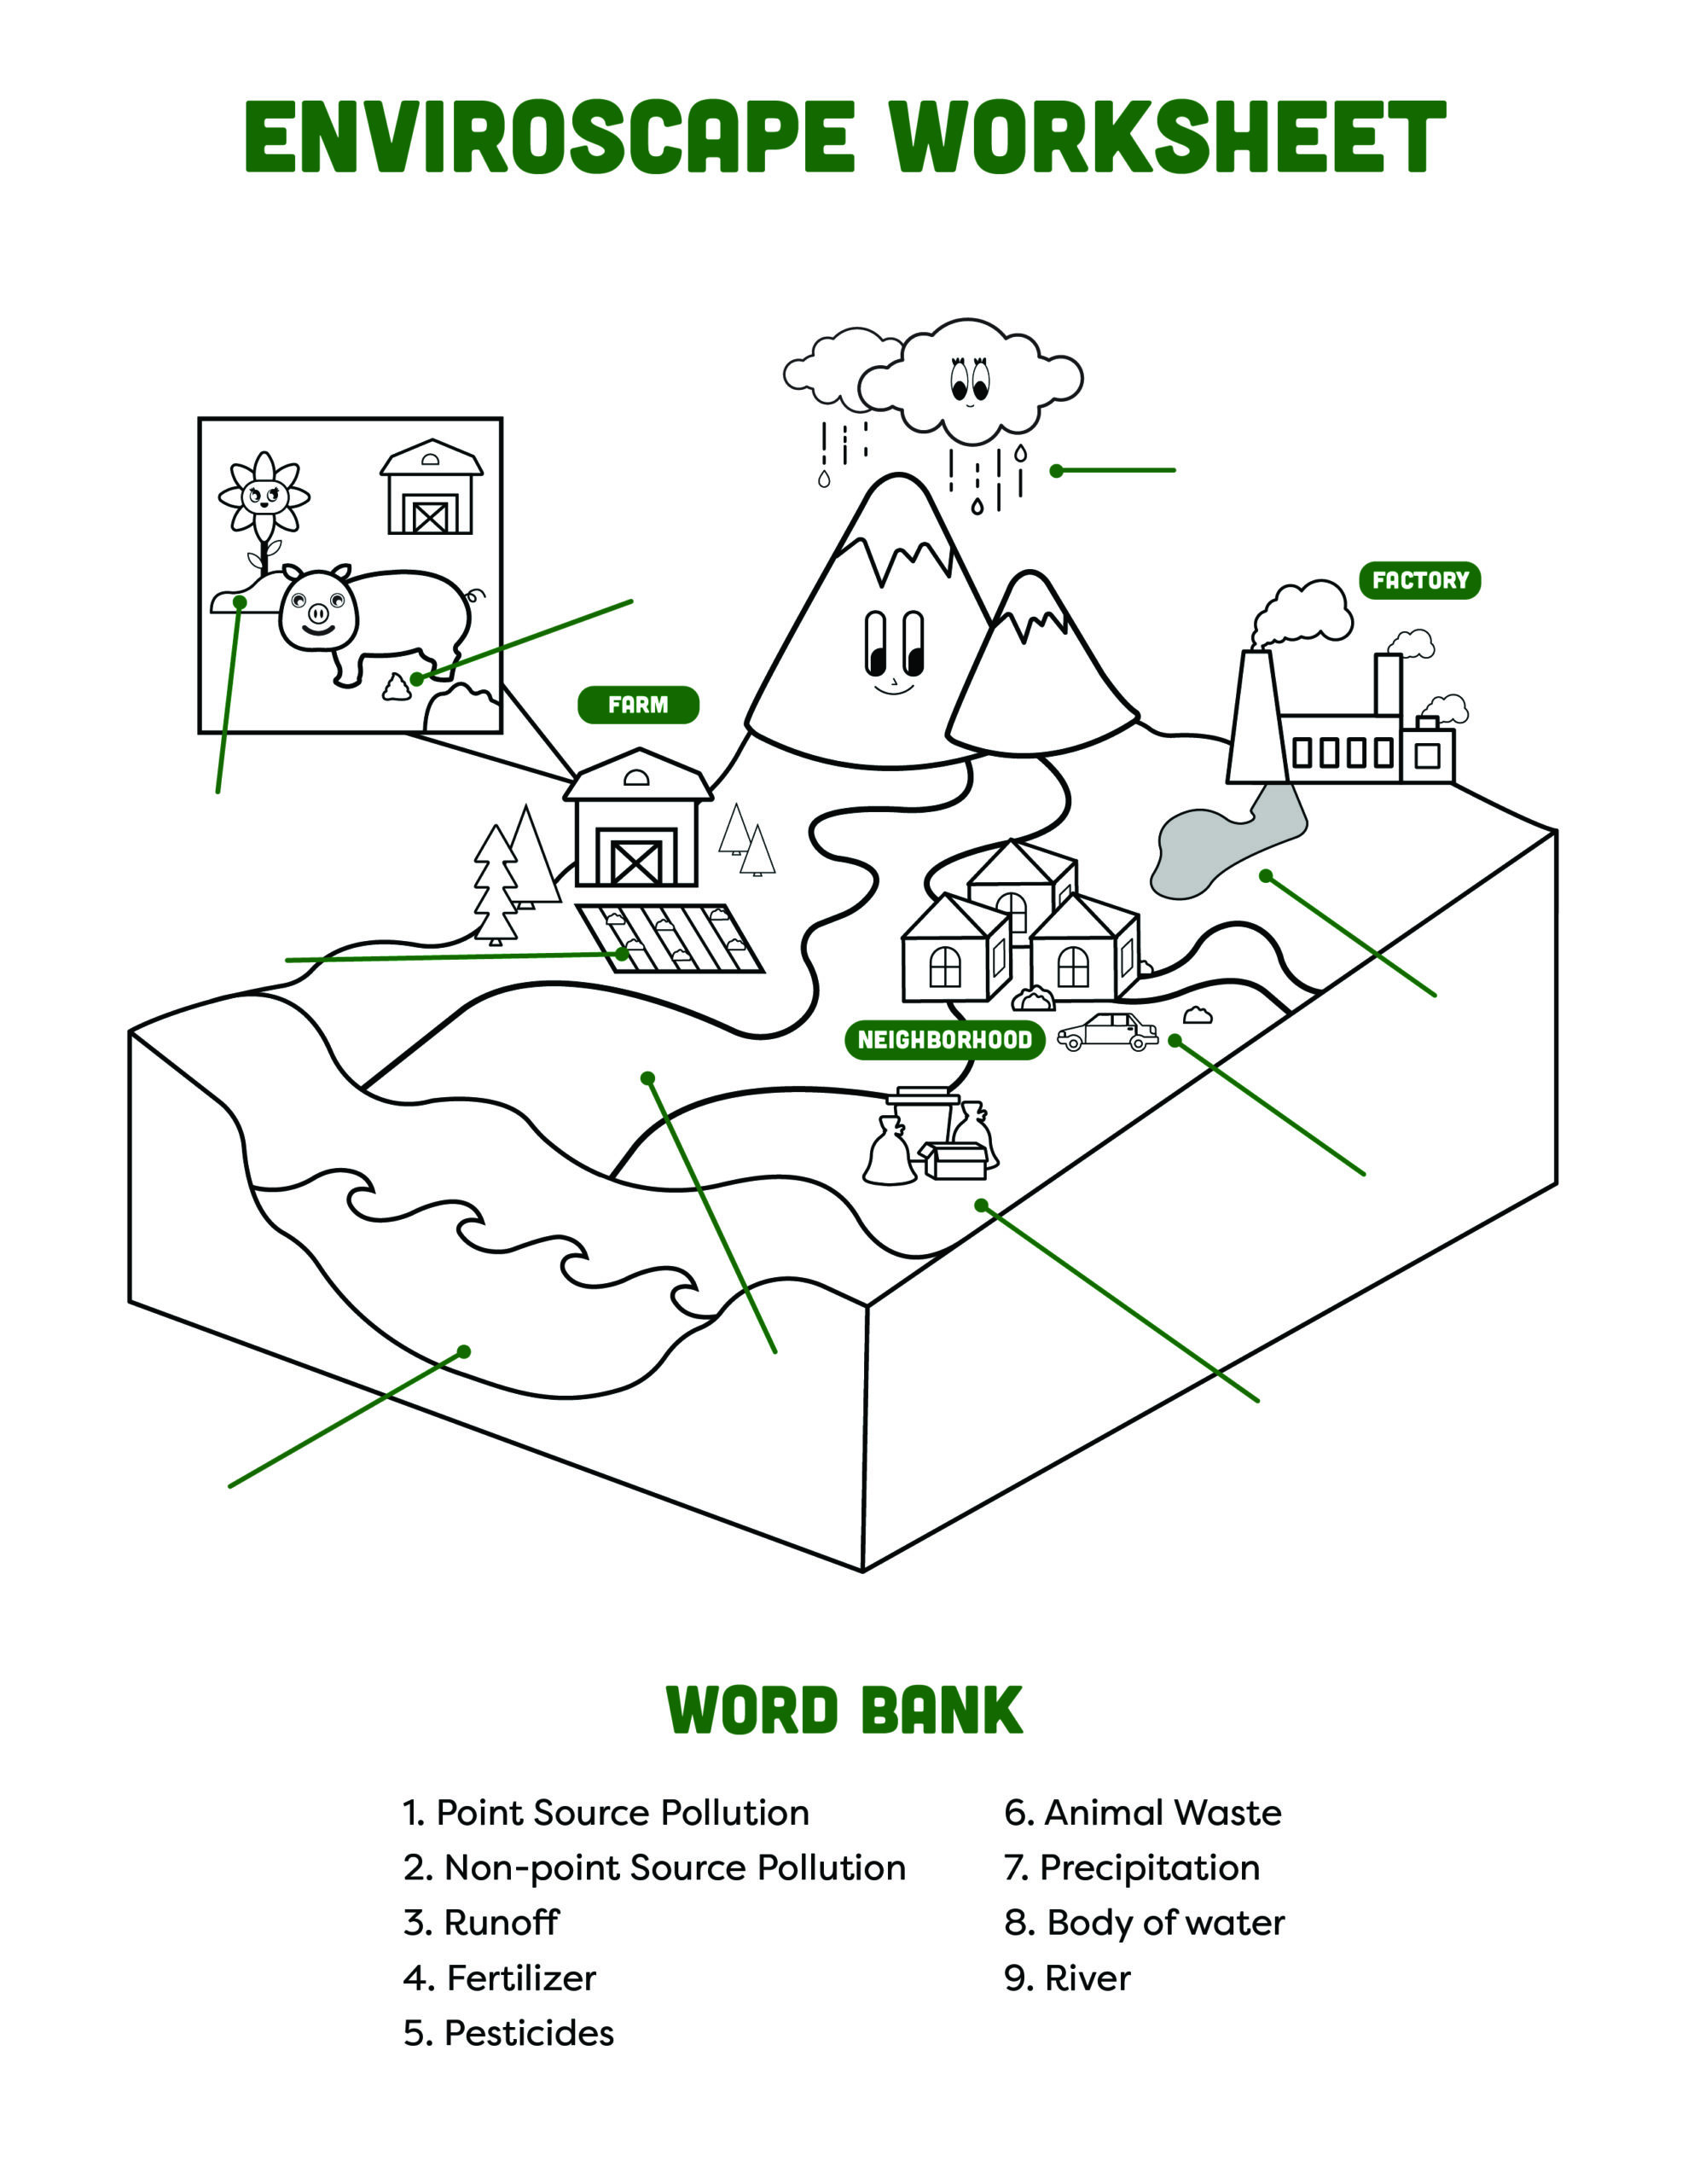
*After you have finished this activity, please refer to our Enviroscape worksheet to fill out a fun word bank with the vocabulary learned in this activity*
Set Up: Set up cups of varying sizes face down in a medium-sized plastic container. Place a large sheet of aluminum foil over the cups in the container and begin to mold the aluminum over the cups to create a mountainous landscape. Keep Kool-Aid mix, markers, and sprinkles on the side. Have a spray bottle full of water, as well as a water source to refill the spray bottle.
Red Kool-Aid represents pesticides
Blue Kool-Aid represents fertilizer
Chocolate sprinkles represent animal waste
Presentation:
Explain the model to your student(s) and go over the various land uses on the watershed. You can compare it to your town explaining where the mountains are, the roads, farms, shopping centers, your home, etc. After you have established the various places on your watershed, have your student go through with a blue marker and color in where they believe water runs through.
Then explain, “A watershed is a land area that drains to a lake, river or ocean. We are in a small watershed right now.” You can show this by spraying water over the model and showing how the water flows down.
Ask your student, “Since we are part of a watershed, do you think our actions affect the water supply?”
Let’s find out!
Activity
Pollution sources
What is pollution?- pollution is when something is added to the environment that is harmful.
There are two types of pollution:
Point-Source Pollution- An identifiable source of pollution. You can pinpoint exactly where the pollution is coming from. An example of this can be an oil spill from a factory. We know exactly where the pollution is coming from.
Non-Point Source Pollution- A non-identifiable source of pollution. You are not able to pinpoint where the pollution is coming from. An example of this can be trash you may see on the street while going for a walk. You know that it is pollution, but you do not know where it came from.
Now, ask your student if they can think of any potential pollution sources. Student may say trash, oil, etc. Although the guesses they give may be correct, we will only be focusing on pesticides, fertilizer, and animal waste for this activity.
Look at your watershed and identify where you believe a farm can be.
“What is something that they use on farms in order to make the plants grow bigger and faster?”
“Fertilizer!”
*Sprinkle blue Kool-Aid over the area to represent fertilizer on the plants*
Ask your student(s) if there are any other areas on the watershed where fertilizer may be used. This can be the mountains, in the backyards of homes or even the sides of the streets where patches of grass are present. Continue to do this for each pollutant.
Now let’s move on to the next pollutant.
“Sometimes plants get attacked by invaders. The invaders can eat away at the plants and cause gardens or rows of crops to suffer.”
“What is something we use in order to get rid of these invaders?”
“Pesticides”
*Sprinkle red Kool-Aid over the areas where your student(s) believes pesticides go*
“Now onto our last pollutant. Animal waste.” (this is one that hits very close to home if you have a pet- if you do not ask your student if they know anyone who has a pet)
“When we are walking our pets, sometimes they need to use the restroom and although most owners clean up after their pets, there are some who do not. Where are some areas this animal waste will stay if not picked up?”
*Sprinkle chocolate sprinkles in all the areas your student believes animal waste can be found*
Remember that animal waste does not only apply to pets, it can come from cows and farm animals as well.
Let the rain begin
Now its time to make it rain!
Ask your student(s) if they know another word for rain.
“Another word for rain is Precipitation!”
*Have your student(s) spray the foil with water (representing rain) specifically in the areas where the “pollutants” were placed and observe what happens to the water.*
Would you want to drink the water?
When rain carries all the pollutants into the water this is called runoff!
Point out how polluted the water is.
“Would you want to swim in or drink this water?”
Explain the water pollution impacts.
Fertilizers used in unrecommended amounts may cause plants in the water to grow at a faster rate and decrease oxygen levels.
The overapplication of pesticides can present potential harm to wildlife and humans due to the many chemicals present within them.
Animal waste can also take up oxygen in the water as well as releasing a nutrient that increases algae and weed growth. This can make the water cloudy and green making it much harder for fish to find food.
Help keep our water clean
Once the student sees the polluted water and learns about its impacts, you can begin to discuss ways that the individuals can help prevent water pollution.
At this time you can place emphasis on cleaning up after your dog. You can also discuss the ways to individually prevent other forms of water pollution, such as using little or no fertilizer and pesticides. You can talk about using ladybugs as an alternative to pesticides, or even using compost as an alternative to fertilizer!
Everything that we do impacts our watershed, so it is important to keep harmful chemicals out of our water to keep it clean!
Next Generation Science Standards* Connections
3rd Grade
- 3-ESS2 Earth’s Systems
- 3-ESS3 Earth and Human Activity
4th Grade
- 4-ESS2 Earth’s Systems
- 4-ESS3 Earth and Human Activity
5th Grade
- 5-ESS2 Earth’s Systems
- 5-ESS3 Earth and Human Activity
Middle School
- MS-LS2 Ecosystems: Interactions, Energy, Dynamics
- MS-ESS2 Earth’s Systems
- MS-ESS3 Earth and Human Activity
- MS-ETS1 Engineering Design
High School
- HS-LS2 Ecosystems: Interactions, Energy, Dynamics
- HS-ESS2 Earth’s Systems
- HS-ESS3 Earth and Human Activity
Common Core State Standards Connections
3rd Grade
ELA/Literacy RI.3.1, RI.3.9, W.3.1, W.3.7, W.3.8
Mathematics MP.2, MP.4, MP.5, 3.MD.A.2, 3.MD.B.3
4th Grade
ELA/Literacy RI.4.1, RI.4.7, RI.4.9, W.4.7, W.4.8, W.4.9
Mathematics MP.2, MP.4, MP.5, 4.MD.A.1, 4.MD.A.2, 4.OA.A.1
5th Grade
ELA/Literacy RI.5.1, RI.5.7, RI.5.9, W.5.8, W.5.9, SL.5.5
Mathematics MP.2, MP.4, 5.G.A.2
Middle School
ELA/Literacy RST.6-8.1, RST.6-8.7, RST.6-8.8, RST.6-8.9, RI.8.8, WHST.6-8.1, WHST.6-8.2,
WHST.6-8.7, WHST.6-8.8, WHST.6-8.9, SL.8.1, SL.8.4, SL.8.5
Mathematics MP.2, MP.4, 6.RP.A.1, 6.RP.A.2, 6.RP.A.3, 6.EE.C.9, 6.SP.B.5, 6.NS.C.5, 6.EE.B.6, 7.EE.B.4, 7.EE.3, 7.SP
High School
ELA/Literacy RST.9-10.8, RST.11-12.1, RST.11-12.2, RST.11-12.7, RST.11-12.8, WHST.9-12.1, WHST.9-12.2, WHST.9-12.5, WHST.9-12.7, SL-11-12.5
Mathematics MP.2, MP.4, HSN-Q.A.1, HSN-Q-A.2, HSN-Q-A.3, HSS-ID.A.1, HSS-IC.A.1, HSS-IC.B.6
Objective: Students will learn about the four different seasons, characteristics, when seasons occur and seasonal associations with plants and animals in the northern hemisphere.
Curriculum grade: Pre-K – 2nd
Directions
Materials:
- Activity Sheet (click to download & print)
- Colored markers, pens, crayons, or pencils
- Season Images
Program Outline: Students will learn about the four different seasons.
Note: There are three different types of coloring sheets that can be done separately or throughout the day.
Duration: The duration of this activity will depend on student drawing time and discussion.
Presentation:
Begin exposing your students to the different seasons by using the photos we provided for you during the four seasons. *Note: If you are doing this at home with direct family members, it may be helpful to provide photos of your own family during the different seasons.
There are four seasons throughout the year: Winter, Spring, Summer, and Autumn. [Show students pictures of the different seasons]
What do you notice about each season?
– Allows students to explore pictures, ask questions about them and discuss the different elements of each season.
Review the seasons once more before beginning activities. Ask the students to identify each one.
Activity
There are three different activities to reinforce subject matter. The activities can be done separately or all at once. If you do them separately, you may have to go over the pictures again.
Drawing the Seasons:
At the top of each drawing sheet, there is an opportunity to practice writing skills; have your students trace the name of the season.
Each worksheet has images on the right-hand side that can be cut out and glued or taped to the worksheet.
There is a worksheet for each season; your students will spend time drawing and coloring the tree on the worksheet for every season. They can add green leaves and extra branches for Spring or leave it leafless for Winter. They can use the season images provided for reference.
*Remember it may be helpful to have pictures of your own family during these seasons to help build connections.
Once the drawings and coloring sheets are complete reinforce the seasons by having your students identify which drawing is associated with which season.
Matching:
Hand your student their matching worksheet. Ask them to identify the plants and animals to ensure their familiarity with the organisms. Once your students understand everything on the sheet; you can help them practice their writing skills or write the names of the seasons in yourself.
Begin matching the organisms to the seasons:
When do we usually see turtles?
- When it’s hot outside (summer); turtles love to sunbathe when it’s warm outdoors.
Draw a line from the turtle to the word “summer”- do this after every plant or animal you discuss.
When do we usually see butterflies?
- Butterflies like warmer seasons. We see them during spring. They are most active during summer.
When do we see owls? (this is a little trickier)
- Owls are more commonly seen during spring in the Chino Creek Wetlands.
When do we usually see geese?
- Geese are migratory birds and begin to arrive during autumn.
- They move south during autumn and leave mid-winter because it’s warmer.
When do trees, like our black walnut live without their leaves?
- They usually lose them through autumn and are completely bare during winter.
- They drop their leaves during autumn to save energy.
When do we see dragonflies?
- They are usually most active during summer.
How often do we see California Poppies?
- We usually see the bright orange flowers during spring.
What season do we usually see lizards?
- Lizards are most active during summer.
- They use the sun to warm their bodies.
Note: This is a coloring sheet to allow students some free coloring time.
Season Clock
Explain to your students when the four different seasons occur.
- Winter: the coldest seasons of the year begins in December and ends in March.
- Spring: Spring occurs after winter, begins in March and ends in June.
- Summer: the hottest season of all four. Summer begins in June and ends in September.
- Autumn: comes before winter and after summer. It begins in September and ends in December.
Use the coloring sheet to identify where each season is. Decorate and color each season with colors (stickers and cutouts) or anything that reminds you of that season.
*If you have the supplies, you can use a push pin and cardboard to make this a permanent clock in your home. Cut out an arrow, as the seasons change you can move the hand. This will reinforce the concepts and help increase your students’ understanding in real-time.
Discussion
Begin exposing your students to the different seasons by using the photos we provided for you during the four seasons. *Note: If you are doing this at home with direct family members, it may be helpful to provide photos of your own family during the different seasons.
There are four seasons throughout the year: Winter, Spring, Summer, and Autumn. [Show students pictures of the different seasons]
What do you notice about each season?
– Allows students to explore pictures, ask questions about them and discuss the different elements of each season.
Review the seasons once more before beginning activities. Ask the students to identify each one.
Next Generation Science Standards* Connections
K – 2nd Grade
- K-ESS2-1 Earth’s Systems
- K-ESS2-2 Earth’s Systems
Objective: Educating students on the water cycle, water forms, and water uses.
Curriculum grade: 2nd-6th
Directions
Materials:
- Activity Sheet (click to download & print)
- Colored markers, pens, crayons, or pencils
- Paper
Optional Supplies:
- Scissors
Thread, string or yarn
Duration: The duration of this activity will depend on student drawing time, discussion and arrows, and typically takes between 10-15 minutes.
Activity
Ask students to draw pictures in the boxes of the eight (8) different locations that water can travel to. You can label the boxes yourself or help them decide in which boxes they’d like to draw the locations (good spelling practice).
- Cloud
- Glacier
- River
- Lake
- Animals
- Plants
- Soil
- Groundwater
This will give them some time to express creativity and allow parents to work on their own projects.
After the kids have completed their maps, have them use a writing utensil to track where their journey takes them. Also, number the arrows so they can keep track.
The following list will tell your students the way they should go.
- Groundwater >> Plants
- Plants >> Clouds
- Clouds >> Glacier
- Glacier >> River
- River >> Lake
- Lake >> Animals
- Animals >> Soil
- Soil >> Plants
Discussion
Once this task is completed, have a discussion about the different modes of transportation the water takes in order to travel to each location.
Look for the O symbol below to give you guidance. These are the modes of transportation the water takes, with a definition to help you explain concepts to your child or children.
* = bonus material that can strengthen understanding
- Groundwater >> Plants
- Plant roots absorb water through the process of osmosis.
- *Groundwater is the water below our feet in the aquifer and one of the places humans can get their drinking water.
- *Aquifers are made from a series of rock, soil and clay.
- Plants >> Clouds
- Just like people perspire, plants lose moisture through their leaves. This process is called transpiration.
- Clouds >> Glacier
- Precipitation: Water released from the clouds in four (4) different forms—rain, snow, sleet, and hail.
- Glacier >> River
- The frozen water is experiencing a phase change. This is the process of solid water turning into liquid form.
- *Phase change = Temperature changes can alter matter (like water), causing it to transform from one state to another.
- * The three different states of matter are liquid, solid, and gas.
- River >> Lake
- Rivers transport water from one location to another, usually to a large body of water, like a lake.
- Lake >> Animals
- Many animals use lakes, ponds and rivers for drinking water.
- Animals >> Soil
- Animals drink water, which is filtered through the kidneys and excreted from the bladder.
- Soil >> Plants
- The roots absorb water and nutrients from the soil.
Parental guidance needed: At this point, the map is complete and you can take this time to create a “bracelet” or “necklace.” Parents or the children can cut out the rectangles of the drawings. Parents can assist by cutting a hole on each side of the rectangle *look for the dots* and help students string the images onto a piece of thread, string or yarn, tie it closed at the end and it’s complete! You can also hang this on a wall or refrigerator like a small banner. It’s an excellent tool to look back on and use for reference during lessons on more of Earth’s systems.
Now is a good time to walk around the house and identify the different places people use water. Help your children point out all the different locations and machines in the house that use/need water to function.
People use a lot of water every day; how can we help conserve (save) water? Have a proactive conservation about the different methods of saving water or have children write a short essay or draw a picture of themselves and how they save water.
Next Generation Science Standards* Connections
2nd Grade
- 2-ESS2 Earth’s Systems
- 2-LS2 Ecosystems: Interactions, Energy, and Dynamics
3rd Grade
- 3-ESS2 Earth’s Systems
4th Grade
- 4-ESS1 Earth’s Place in the Universe
- 4-ESS3 Earth and Human Activity
5th Grade
- 5-PS1 Matter and Its Interactions
- 5-PS2 Motion and Stability: Forces and the Interactions
- 5-LS2 Ecosystems: Interactions, Energy, and Dynamics
- 5-ESS2 Earth’s Systems
Middle School
- MS-ESS2 Earth’s Systems
- MS-ESS2 Earth and Human Activity
Objective: Educating students on water consumption through the process of agriculture, and the impact of water importance for daily food consumption.
Curriculum grade: 1st-5th
Directions
Materials:
- Activity Sheet (click to download & print)
- Activity Sheet with Answers (click to download & print)
- Coloring Pencils, Crayons, Markers, or Highlighters
Duration: The duration of this activity will be ~15 minutes.
Discussion (before activity):
How many gallons of water do you think it takes to make ONE cheeseburger?
– Gather guesses, but don’t give away the total gallons. Once activity is finished the total gallons will be revealed.
Well let’s discuss each ingredient of the cheeseburger to find out exactly how much water it takes.
Activity
Have student color each ingredient in after discussing how many gallons it takes to make the ingredient and why it is that amount.
The first step to a cheeseburger is the top bun. How many gallons of water do you think it takes to make the top bun of the cheeseburger? (11 gallons) Why?
- Wheat is a main crop in cheeseburger buns. Water is an essential part to help wheat grow.
The next ingredient is the lettuce. How many gallons of water do you think it takes to make the lettuce? (1 ½ gallons) Why?
- Lettuce leaves grow on farms that must be watered.
The next ingredient is the tomato. How many gallons of water do you think it takes to make the tomato? (3 gallons) Why?
- Tomatoes also grow on farms on vines that must be watered.
The next ingredient is the cheese. How many gallons of water do you think it takes to make a slice of cheese? (56 gallons) Why?
- Cheese is made of milk and milk comes from cows that must consume water, too.
The next ingredient is the meat. How many gallons of water do you think it takes to make one meat patty? (616 gallons) Why?
- Meat patties come from cows. Cows must drink a lot of water to live.
And finally, the last part of a hamburger is the bottom part of the bun. We already know how many gallons the top bun is and the bottom bun is the same! (11 gallons)
So, if we add all the gallons together, the total amount of water to make a cheeseburger is: 698 ½ gallons.
Discussion
Wow! It took almost 700 gallons to make just one hamburger. Imagine if someone ate a hamburger every day for a whole month; that would be almost 21,000 gallons!
BONUS question: Do you think it takes more water to make hamburger or a chicken sandwich?
Answer: It would take more water to make the hamburger because the cow is bigger than the chicken, therefore, needing more food and water to grow.
So, we have to remember every time we bite into a real hamburger, we have California’s WATER to thank for it!
Next Generation Science Standards* Connections
1st Grade
- 1-LS1 From Molecules to Organisms: Structures and Processes
2nd Grade
- 2-LS2 Ecosystems: Interactions, Energy, and Dynamics
3rd Grade
- 3-LS1 From Molecules to Organisms: Structures and Processes
- 3-LS2 Ecosystems: Interactions, Energy, and Dynamics
4th Grade
- 4-LS1 From Molecules to Organisms: Structures and Processes
5th Grade
- 5-PS3 Energy
- 5-LS1 From Molecules to Organisms: Structures and Processes
- 5-LS2 Ecosystems: Interactions, Energy, and Dynamics
- 5-ESS3 Earth and Human Activity
Common Core State Standards Connections
1st Grade ELA/Literacy RI.1.1, RI.1.2, RI.1.10, W.1.7 Mathematics 1.NBT.B.3, 1.NBT.C.4, 1.NBT.C.5, 1.NBT.C.6
2nd Grade ELA/Literacy W.2.7, W.2.8, SL.2.5 Mathematics MP.2, MP.4, MP.5, 2.MD.D.10
3rd Grade ELA/Literacy RI.3.7, SL.3.5, RI.3.1, RI.3.3, W.3.1 Mathematics MP.4, 3.NBT, 3.NF, MP.4, 3.NBT
4th Grade ELA/Literacy W.4.1, SL.4.5 Mathematics 4.G.A.3
5th Grade ELA/Literacy RI.5.1, RI.5.7, RI.5.9, W.5.1, W.5.8, W.5.9, SL.5.5 Mathematics SL.5.5, MP.2, MP.4, MP.5, 5.MD.A.1
Objective: Educating students on aquifers, the process of pumping groundwater to the surface by wells to provide us with a clean water supply, and the impact of pollutants on groundwater through the means of hands-on experimentation.
Curriculum grade: 3-8th
Directions
Materials:
- Vanilla ice cream
- Clear soda (7-Up, Sprite, etc.)
- Chocolate cookies
- Sprinkles
- Gummy Bears
- Drinking straws
- Spoons
- Clear cups
- Paper towels
- Food processor/blender (optional)
Duration: The duration of this activity will be ~45 minutes.
Preparation (before activity):
Each ingredient in this activity represents a part of an aquifer as you can see in the visual aid attached. For the chocolate cookies it is recommended that you crush them either in a bag or in a food processor/blender in order to make the consistency appear more like the dirt it represents.
Discussion (before activity):
What is an aquifer?
• An aquifer is an underground layer of rocks and soil holding water. Aquifers can be just a few feet under the soil or can sit hundreds of feet deep. (Use visual aids of an aquifer.)
How do you think water enters an aquifer?
• It seeps through the ground as rain, wastewater and condensation or can be fed by underground streams. Water can move through these materials because they have large connected spaces that make them easy to pass through.
What is groundwater?
• Groundwater is exactly what it sounds like; water underground that is found in the cracks and spaces in soil, sand and rock. (Refer to visual aid.)
What is pollution?
• It is the introduction of pollutants into the environment that are harmful to humans, animals, and the environment itself.
Do you think we can pollute groundwater even if it’s underground?
• Yes, let’s name some types of pollutants. Oil, chemicals, fertilizers, silt, sewage, pesticides, insecticides…
Where do you think these pollutants come from?
• They can come from many places, such as construction sites, dairies, farms, factories, trash that has been disposed improperly. It can even come from our own home!
To better understand how pollutants enter groundwater, we are going to experiment by making our own aquifers.
Activity
*For this activity parental guidance is needed in the construction of the aquifer.*
At this time, make sure you have all of your materials laid out in front of you with the exception of the ice cream. This can be kept in the freezer until needed to prevent melting. Please use a spoon to scoop each ingredient as you go.
The first step is to fill your cup about ¼ of the way with clear soda. This is our groundwater. Tell your child(ren) to keep a close eye on what happens to the “water” throughout the activity.
Now, cover the clear soda about one-third of the way with your cookie crumbs. This represents all of the sand, gravel, and rocks in the aquifer. See how the “water” fills in the spaces around the “gravel, sand, and rock.” Pay close attention to the line created by the water. This is called the water table. Have the student watch how the water table may change throughout this activity.
The next layer of our aquifer represents hard surfaces or ‘rocks’. (Gummy bears). Talk to your student about what happens when you add gummy bears to the aquifer. Because they are heavy, they sink the bottom and the water table rises.
The next layer of our aquifer is called the confining layer, which is usually clay or dense rock. It is significantly difficult for water to get through this layer, so it helps protect the aquifer from contamination. The water is confined below this layer. Today our confining layer is going to consist of ice cream. Spread a layer of ice cream over the cookie crumbs, gummy bears and soda.
Now add another layer of “gravel and sand” (cookie crumbs).
(After everyone has assembled their aquifers up to this point, discuss pollution.) If groundwater is polluted, it will no longer be safe to drink. Groundwater that is pumped from aquifers is continuously tested by water suppliers for possible contamination. If unsafe levels of contaminants are detected, wells must be shut down. Treatment of contaminated or polluted water is very costly. Pollution prevention is a better option, environmentally and economically. Drinking water is a limited resource that needs to be protected. Let’s see what happens if we add contaminants to our aquifer.
The next layer is our porous, top layer of soil. Porous means it easily absorbs water or easily let’s water pass through it. This represents grass, fertilizers, and pesticides. Sprinkles can be used to represent this layer. If these fertilizers and pesticides make their way down to our groundwater is this good or bad? Bad! Compost and biocontrol are good ways to keep our groundwater clean.
Now, using your straw, drill a well (a well is a pipe in the ground that fills with groundwater) into the center of your aquifer and push it all the way to the bottom of the cup. Slowly begin to pump the well by sucking on the straw, bringing the water to the surface. Watch as the water table goes down. Also, watch and see how the contaminants can get sucked into the well area and end up in the groundwater by eventually leaking through the confining layer.
Heavy rains or melting snow may cause the water table to rise, or heavy pumping of groundwater supplies may cause the water table to fall. In some areas of the world, people face serious water shortages because groundwater is used faster than it is naturally replenished. In other areas, groundwater is polluted by human activities.
Pretend it’s raining and recharge/replenish the aquifer by adding more soda. A real aquifer takes a lot longer to recharge; this is just an example to speed up the process and give you a little more soda to drink!
Student may eat the “aquifer” at this time and any cleanup may begin.
Discussion
Aquifers are very important because they provide clean drinking water! Now that we know how they work it is important for us to reduce the amount of pollution that could seep into them in order to keep our water safe!
Next Generation Science Standards* Connections
3rd Grade
- 3-ESS3 Earth and Human Activity
4th Grade
- 4-ESS2 Earth’s Systems
-
4-ESS3 Earth and Human Activity
5th Grade
- 5-ESS2 Earth’s Systems
Middle School
- MS-PS3 Energy
- MS-LS2 Ecosystems: Interactions, Energy, and Dynamics
- MS-ESS2 Earth’s Systems
- MS-ESS3 Earth and Human Activity
Common Core State Standards Connections
3rd Grade
- ELA/Literacy W.3.1, W.3.7
- Mathematics MP.2, MP.4
4th Grade
- ELA/Literacy RI.4.1, RI.4.7, RI.4.9, W.4.7, W.4.8
- Mathematics MP.2, MP.4, MP.5, 4.MD.A.1, 4.MD.A.2, 4.OA.A.1
5th Grade
- ELA/Literacy RI.5.7, W.5.8, SL.5.5
- Mathematics MP.2, MP.4, 5.G.A.2
Middle School
- ELA/Literacy RST.6-8.1, RST.6-8.3, RST.6-8.7, RST.6-8.8, RST.6-8.9,RI.8.8, WHST.6-8.1, WHST.6-8.2, WHST.6-8.7, WHST.6-8.8, WHST.6-7.9, SL.8.1, SL.8.4, SL.8.5
- Mathematics MP.2, MP.4, 6.RP.A.1, 6.RP.A.2, 6.RP.A.3, 6.EE.C.9, 7.RP.A.2, 8.EE.A.1, 8.EE.A.2, 8.F.A.3, 6.SP.B.5, 6.NS.C.5, 6.EE.B.6, 7.EE.B.4
Objective: Search around your house to find the things below that help you save the planet!
Curriculum grade: K-12th
Directions
Materials:
Activity
Search your house for the items listed in the scavenger hunt.
Then describe why each item helps save the earth.
Discussion
Talk about everything you found and how it affects the planet.
Next Generation Science Standards* Connections
Kindergarten
- K-PS3-2 Energy
- K-ESS3 Earth and Human Activity
1st Grade
- 1-LS1-From Molecules to Organisms: Structures and Processes
2nd Grade
- 2-LS2 Ecosystems: Interactions, Energy, and Dynamics
3rd Grade
- 3-ESS32 Earths Systems
4th Grade
- 4-PS3-Energy
5th Grade
- 5-ESS2 Earth’s Systems
Middle School
- MS-PS3-4-Energy
High School
- HS-ESS3 Earth and Human Activity
- HS-Human Sustainability
Objective: This activity will teach students about local and migratory birds that rely on our wetlands for survival.
Curriculum grade: K-8th
Directions
Students will discuss the diverse types of birds that come and visit wetlands. They will describe specific characteristics of the birds, habitats and food that the birds eat.
Materials:
- Bird Bingo Directions
- Markers, pens, or crayons
Presentation
You’re going to play bingo using different species of birds we commonly see at the Chino Creek Wetlands and Educational Park.
Explain how to play the game to all participants: There will be one person announcing the bird species and everyone will cross off the bird that was called, as long as they have it on their card. *Remember, not all cards are the same and may be missing some birds.
Activity
Play a couple of different rounds: bingo straight across the board, bingo going down the board, black out, etc.
Make sure all participants have a bingo card with different images of the birds. You may print these or download them onto a device.
The bird species are in the chart below; you can call them randomly from the chart or you can print and cut them out into individual squares.
Call out one bird species at a time. Once everyone has a had a chance to cross off the bird, discuss the characteristics of the species before moving on to the next bird.
*Please refer to the Bird Descriptions document for photos and characteristics. *
– The descriptions of the birds are directly below the photograph of that species.
Additional fun facts about birds that come to wetlands:
– Water birds depend on free-standing water to feed – by swimming, wading or diving – or to establish nesting sites. These include waterfowl (ducks, geese, swans), grebes, pelicans, cormorants, crakes, rails, ibis, egrets, herons and shorebirds (or waders).
– One of the best-known functions of wetlands is to provide a habitat for birds. Wetlands are important bird habitats, and birds use them for breeding, nesting, and rearing young. Birds also use wetlands as a source of drinking water and for feeding, resting, shelter, and social interactions. Some waterfowl, such as grebes, have adapted to wetlands to such an extent that their survival as individual species depends on the availability of certain types of wetlands within their geographic range. Other species, such as the northern pintail or the American widgeon, use wetlands only occasionally during their lives.
– Humans have known of the link between birds and wetlands for thousands of years. Prehistoric people drew pictures of birds and wetlands on cave walls, scratched them onto rocks, and used them in the design of artifacts. Native American lore also provides accounts of bird hunts in wetlands.
Next Generation Science Standards* Connections
Kindergarten
- K-ESS2 Earth’s Systems
- K-ESS3 Earth and Human Activity
1st Grade
- 1-LS3 Heredity: Inheritance and Variation of Traits
2nd Grade
- 2-LS4 Biological Evolution: Unity and Diversity
3rd Grade
- 3-LS1 From Molecules to Organisms: Structures and Processes
- 3-LS2 Ecosystems: Interactions, Energy, and Dynamics
- 3-LS3 Heredity: Inheritance and Variation of Trails
- 3-LS4 Biological Evolution: Unity and Diversity